Friday, November 16, 2018

Swiss Tradition of Tavillonnage

I spotted this excellent article on Swiss wood shingling on the BBC today. (See link below)

http://www.bbc.com/travel/story/20181115-switzerlands-artfully-tedious-job
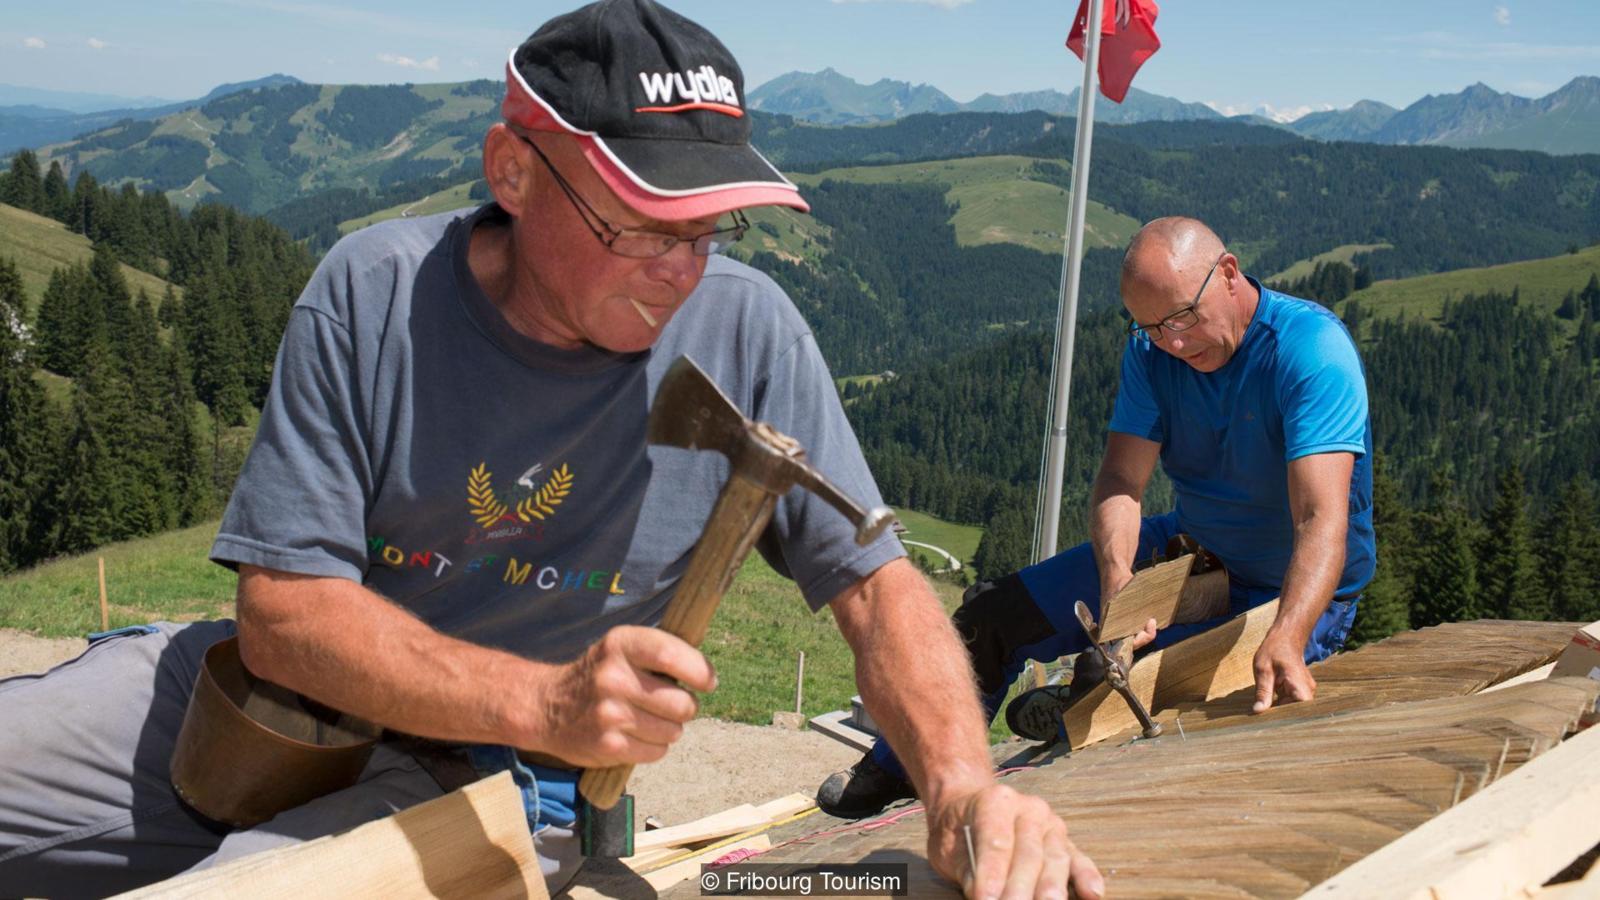

I have only done one wood shingled roof and I absolutely hated it because it was so tedious. The roof these Swiss masters are doing in the article makes what I did seem like childs play. Oh, what I would do to be able to move to the Swiss Alps. The only mountains we have in Nebraska are from the piles of corn after harvest.

Link to Youtube video on Tavillonage: https://www.youtube.com/watch?v=4tvuIQy34M8

Sunday, November 11, 2018

Happy Veterans Day!

Happy Veterans Day! The guy to the very left of the picture is me waiting to get out of a very hot airplane in the 1990s. Boy how my life has changed! I don't miss everything from my career, but I do miss parts and veterans day brings those memories back. 


Tuesday, October 17, 2017

Traveling Blacksmith Forge

Last month I finally finished my traveling forge. I wanted something that I could completely take apart for easy transport, so after looking at a lot of photos on the internet, this is what I came up with. I’ve used it for at a couple of living history events and it has met all of my expectations. The only real negative I found is that the bellows is HEAVY. But what the hell, it puts out a good flow of air with little effort.

The hardest part of the whole project was making the bellows. I used 1-inch thick pine for the body and followed the directions in the attached pamphlet. For the covering, I choose heavy waterproofed canvas over leather to save money. Not really thinking it through, I purchased a very reasonably priced canvas tarp that was made in India. As it turned out, the material makes a great fire starter which is not really a desirable trait for something that will spend its life around fire. As long as I am careful, it should be fine.   

I purchased the fire box from Fiery Furnace Forge on eBay, and I have been very happy with it.


Thursday, March 9, 2017

Log Replacement for Circa 1930 Cabin

This week I’ve been repairing a log cabin for the Antelope County Museum in Neligh, Nebraska. I was told that the cabin was built as a playhouse for a prominent man’s daughter in the 1930’s.

The cabin was made out of cedar logs. This might seem a bit strange, but trees were sparse in these parts with the exception of cedar and cottonwood. I’ve also been told that the trees might have come on a train from the Black Hills, while that would have been possible, I’ve not researched it so it's hard to say.

I sourced a suitable cedar log from the local area and had it sawed down the center. I knew I would have to do a lot of shaping to get it to fit so I went with an oversized log and whittled it down with a chainsaw and a power planner to get it to 6 inches wide at the bottom. It took about 5 hours of cutting and finessing to get it to fit.

Thanks to the cabin being constructed out of a light wood raising it up with wedges to get the log in was easy. Once the weather warms up I will start replacing the missing chinking.      

If you’re in the area this museum is a great place to visit and has a lot of interesting artifacts on display. A few years ago I discovered a Caesar Chelor molding plane there that was relegated to a pile of mass-produced planes from the late ninetieth century. After explaining the significance and value of the plane to the members of the museum it has since been displayed in a more appropriate manner.

Friday, March 3, 2017

Home for Misfit Tool (or) Rebirth of a Tinsmith Burring Machine


Recently I’ve gained an interested in the tinsmithing trade. This opened up a whole new area in tool collecting for me so I have been diligently searching tools sites and eBay for finds. During my searches, I’ve come to realize that tinsmithing tools are expensive and relatively hard to find. When one does happen upon a find there’s generally a lot of competition for the tool driving up its cost. This has caused me to aim for the low hanging fruit like the rusted nugget of a burring machine pictured here.

Roughly speaking (I am no expert) a burring machine forms a small 90-degree lip on the edge of a piece of tin. This tool is especially useful when forming a lip on a circle such as on the bottom of a cup. (See picture of tin bottom)


This machine was horribly rusted and I suspect it spent a lot of time in water. After soaking in rust remover I wired brushed the metal and painted the areas black that were once coated in black japanning. The original wooden handle was shot so I turned a new one on the lathe shined up the brass and put it back together. The forming heads are pitted from rust so they tend to transfer the roughness to the tin but other than that it seems to work. Pretty good for a tool around a 150 years old.

From all I’ve read and watched on videos, this is not an easy tool to use. I will need a lot of practice. But overall I am happy with the finished results.        


Friday, October 7, 2016

Norwegian Open-Hearth Farm House

Last night I came across this excellent film on YouTube from the Norwegian Folk Museum. The film documents the reconstruction of an open-hearth farmhouse in Norway from circa 1650.

Period correct tools are used throughout the construction and the craftsmanship is incredible! What I found particularly interesting was the manner in which the builders moved and placed the heavy logs. This video is definitely worth watching.

Tuesday, September 27, 2016

Forge Cart Made With Pipe Fittings

I recently purchased a gas forge and needed a cart to place it on. I couldn’t find anything locally or online that I liked so I decided to build the cart myself. Since I didn’t want to place the forge on a wooden stand I needed to come up with a way of making a stand out of metal that didn’t require welding. The easiest although not necessarily economical method was to build the cart out of ¾ inch pipe fittings.


The build was pretty straightforward and with the exception of drilling the holes through the 1/8th inch top was easy and only took about an hour. The nice thing about using pipe fittings is that it’s easy to level the cart legs by simply screwing the pipe with the wheels on it in or out.


Some people will probably wonder why I purchased a gas forge since I already have a coal forge. I will continue to use both. I got into to blacksmithing to make hardware for the tools and furniture I make. I have found that if I only need a few items like a bolt or nails the coal forge can be a pain because it takes a while to build up a good fire and short projects tend to waste coal (the nearest place I have to buy coal is about 2 hours away). With a gas forge, all I have to do is turn a valve and I have fire. The gas forge also uses propane which I can buy in my town.  


Friday, September 2, 2016

Farmhouse Table

I haven’t posted anything in a long time so I thought I would show a picture of a country farmhouse table I made for a benefit for my kids' school.

The table is 72” x 48” with 3.5” tapered legs. The table and benches are built from construction grade lumber. Since the wood found at my local box store is complete trash I only used wood purchased from there to build the aprons and legs of the table and benches. I laminated the legs to make them more stable and sturdy.  After giving up trying to find usable lumber at my local box store, I happened upon a small contractor supply business in my town that had great quality pine lumber. Lumber from there cost a bit more but I was able to get nice straight boards with no wane to construct the top of the table and benches.  

This was a fun project and I hope to make more tables to sell.

Sunday, November 8, 2015

Wooden Grindstone Frame

Finally finished my grindstone setup for my blacksmithing demonstrations. I loosely copied the design from the one built by the Dominy’s (see attached picture).

The frame is white oak with drawbore mortice and tenon joinery. The frame is really solid and I’m surprised how easily the wheel rotates on the wooden bearings. The weight of the stone creates quite a bit of centrifugal force so once the stone is turning very little effort is needed to keep it going.

The handle is detachable and like the Dominy’s it is held on with a wooden thumb screw. The only part left to make is the water trough. I had a lot of overly complicated ideas for this, but I think I will keep it simple and just hollow out a log.       


Wednesday, September 16, 2015

Timber Frame Workshop Build on Youtube

A few weeks ago I stumbled upon a great channel on YouTube called Mr. Chickadee. Mr. Chickadee is chronicling the building of a timber frame work shop using period hand tools. This guy is a great craftsman and I recommend watching his videos. You won’t be disappointed!


Sunday, August 23, 2015

Rope Bed

Sorry, I haven't posted anything in awhile, but life has kept me quite busy. My latest project is a rope bed for the Dederman Cabin in Norfolk, Nebraska. The cabin already had a rope bed, but this bed will be used to let visitors experience what it’s like to lie down in one.

I wanted to make a bed that was similar to what an early settler could have made with materials available on the frontier. I was going to copy the bed from the attached 1888 Solomon Butcher photo, but I settled on a slightly updated design using mortice and tenons instead of nails to hold it together. I also used only the bare basic tool that any pioneering family would have had. I used a crosscut saw, brace and bit, ax, foreplane, some chisels, and some basic layout tools like a square and some marking gauges. I did use a mortise chisel, I doubt most people would have had one, but I did so I used it.


The bed came out really nice and is plenty sturdy. It has to be to stand up to the use it will get from kids plopping in and out of it. My wife liked it a little too much and placed a quilt on it that she had made. Now she wants one for in the house. 


Thursday, July 24, 2014

Shrink Pots and Birch Bark Containers

Some random projects of this summer.

The shrink pot is made out of Chinese Elm and to my surprise is watertight. The spoon is carved out of apple wood.

Of course, all of this had to be approved by
my dog who is in charge of all snacks containing meats and gravies as well as anything photographed in her yard. She also loves to have her picture taken.


Thursday, July 10, 2014

Dovetail Hinge with Peter Ross

Recently I purchased a DVD from Popular Woodworking featuring Peter Ross forging a dovetail hinge. As with other Peter Ross DVD’s, it was well done and very informative. Someday I would love to take a class with him, but as North Carolina is a long way from Nebraska, I will have to settle for watching videos. I do hope there will be more in the future.

I got into blacksmithing so I could fabricate my own hardware for the furniture and tools I make. This video was informative enough so someone with a beginner skill level like myself could actually turn out a working period correct hinge. Besides a basic blacksmithing setup, all I needed to make the hinge was a jig to bend the sheet metal around. This was difficult because I don’t have a modern welder, but I was able to cobble together something out of angle iron and bolts. It did work just not that great so I will have to find someone to weld me a jig like Ross’s.


The hinge itself is formed by forge welding 16 gauge sheet metal to itself. The blanks are shown on the top of the door panel. From there it’s all about filling and fitting. My hinge is not as nice as Ross’s, but I’m pleased with it.

If you want to make a working period hinge, but don’t have a blacksmith shop try making a snipe/gimmal hinge like the set below the dovetail hinge. I made these by taking the thickest clothes hanger I could find, heating it with a torch, and bending the loop around a 16 penny nail. Hammer or file flat and you have a very durable hinge.


See Peter Follansbee webpage for more information on gimmals and how to install them. I have used them on a tool chest I made and they have worked great. Keep in mind modern mild steel is more durable than the old wrought iron used in antique gimmal hinges.

Wednesday, April 23, 2014

This Week in My Forge

Finally, the weather is getting nice so I've been able to get back into my forge for some tinkering around.

The first project I made was a trivet. This was a lot harder than I thought it would be, but I am happy with the results. Getting the circle shape is harder than it looks, but by trial and error, I got the circle close enough to round. This made me really want to get a blacksmith cone. The other fun thing with this project was the forge welding of the circle. This was the best weld I have done to date and after filing the edge I could see I got good fusing.

The next project was a trammel and grease lamp. In use, the lamp has a wick in each corner so it puts out a lot of light. The traditional fuel for the lamp is tallow, but I use olive oil. I burned the lamp for two hours on a filling of olive oil with all four wicks going and I still had a little oil left to go.

My dog is my chief engineer and security consultant with all my projects and today was no exception. She would not get out of the way until I took her picture.

Sunday, February 23, 2014

Log Cabins in Nebraska

Whitwer Site
This weekend I explored a cabin site built by Nicholas Whitwer an immigrant from Rohrbach Switzerland. Mr. Whitwer lived in a dugout for several years until the log cabin was constructed in the early 1870’s. The area the cabin was located in is remote and for the most part untouched by modern agriculture. With the help of the landowner, I was able to locate the cabin foundation (metal stake in the center of the picture is the middle of the cabin) and even found part of one of the oak logs complete with borehole for a wooden pin that held the wall together. The owner also showed me the dugout and well. 

Whitwer cabin after being used as barn
I learned from another resident in the area who is 93 years old (I should say young because he still cuts his own firewood) that the cabin was torn down in late 1940. He was able to save some of the wood and later carved a horse out of it. See the accompanying picture. This old guy is probably one of the most interesting people I have ever met and a wealth of historical knowledge. He remembered playing in the cabin as a kid. He said that the Whitwer’s cut the logs with a pit saw and they were not hewn. He said there was no daubing or chinking that the cabin planks were fit tight.

Horse carved from cabin log
What makes this story so interesting to me is that oak logs were used. There were few trees of any kind this far west in Nebraska, but this location was unique as it had a very large growth of oaks. The area was soon clear cut and the oak logs were used to build a flour mill in both Norfolk and Oakdale Nebraska.  

Contrary to popular belief log structures in early Nebraska was quite common. The first documented log structures in Nebraska were built by James Mackay in 1795. Many more log structures were built for trading posts involved in the fur trade in the state. In 1819 Fort Atkinson was constructed of logs. It was huge, holding around a thousand troops and consisted of many log outbuildings. In 1846 the Mormons built a little over 500 log cabin in the Winter Quarters located north of present-day Omaha. They did most of this in a little over two months!

Sod houses were first made by Mormons at Winter Quarters, but they really did take off until around the 1880’s when most of the good land was taken and most of the trees were cut down. Most photos of sod houses come from the Solomon Butcher Collection. He made over 2000 and his photos saturate history books. It must be pointed out, however, that most of Butchers work contain pictures of sod houses constructed primarily in the area of Custer County Nebraska towards the end of the ninetieth century.  

Friday, January 31, 2014

Conestoga Wagon Jack

I finally found a Conestoga wagon jack I could afford. I love these things because of their history, age, and the blacksmith skills it took to make.

This one is dated 1797 and is in bad shape. I didn't want a museum quality one I wanted one so I could examine the inner workings and see how it was constructed. Someday I would like to make one, but for now, I am going to study this one and restore it to working order. Should be fun and I plan on taking lots of pictures and drawings and posting them on the blog.


Saturday, December 21, 2013

The Trade of the Joiner

Came across this video on sash construction from the Arnold Zlotoff Tool Museum. Great video check it out at  http://www.arnoldzlotofftoolmuseum.com/Trade_and_Crafts_Videos.html

Sunday, September 15, 2013

Mini Moravian Spring Pole Lathe

My latest project is a smaller version of a Moravian spring pole lathe. I've seen pictures of this lathe in some of Roy Underhill’s books, but I became really interested when I saw it featured on the Horn Guild’s blog. They have some great photos of a reproduction at Old Salem Village in Winston Salem.

I had a spring pole lathe, but it got to be a pain using it at living history events because of the problem with transporting the long pole. Finding a good straight pole is difficult in my part of Nebraska because the trees tend to grow more out in the open. This causes the trees to be more scraggly and gnarly. Not good for a spring pole.

I wanted a pole lathe that I could break down and set up with no tools. I also wanted it to be self-contained so if I had to set up on concrete or in a building I could. The Moravian spring pole lathe was the ticket. I will

primarily use the lathe to turn chair parts, but with the application of a modified tool rest, I should be able to turn bowls. The thing I’m most impressed is the tensioning device I use for my hickory spring. By turning the screw I can move it on the beam thereby changing the resistance.

Overall I’m pleased with the outcome, but I’m still tweaking the design. The first problem I encountered was the cotton cord I was using was stretching. I fixed this problem by using 550 parachute cord…I know this is not historically correct, but for now, it will have to do.  I am also not fully satisfied with the foot treadle. It’s weight and the combination of the leverage caused by the pitman arm robs tension from the hickory spring. The easiest fix is to add weight to the end of the spring to counteract the weight of the treadle, but I will have to play around a bit first as the treadle is awkward to use. It needs more refining than just adjusting the weight.  


Last week I used it at the local museum's pioneer day. The lathe drew a crowd which is always good because I want people to get involved and uses the tools I display not just watch me use them. The lathe was the definite favorite of the kids. Most of the people that tried the lathe could not really coordinate the foot and tool action together, but in the case of the children, it didn't matter they just want to work the treadle. I just about could have charged admission for the amount of kids wanting to pump the foot treadle. It actually worked out nice because it was extremely hot and humid and I had plenty of child labor to power the lathe while I did the turning.